
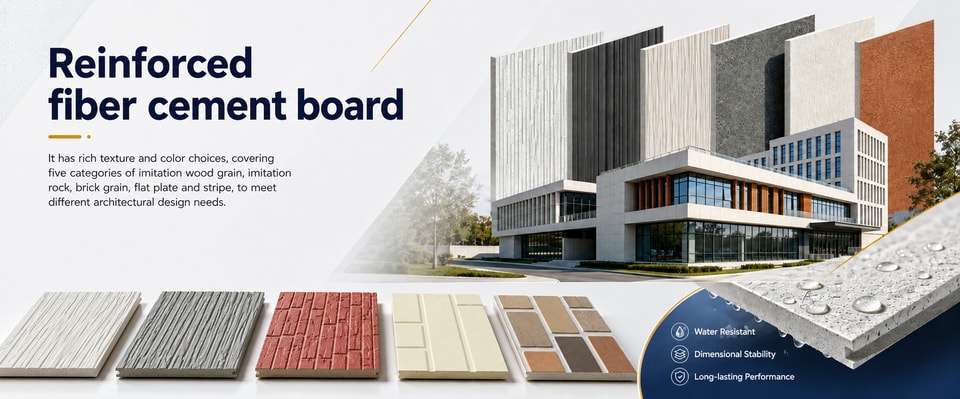
Fiber Cement Siding Installation Guide: Key Steps for Contractors
Fiber cement siding is a durable exterior cladding option, yet its long-term performance depends on how carefully it is prepared, handled, fastened, flashed, and finished. For contractors, a disciplined installation process protects the wall assembly, keeps the project within warranty requirements, and reduces costly callbacks.
This guide covers the practical siding installation steps for fiber cement exterior wall panels, lap siding, and board-and-batten applications, with guidance that applies across different climates and building codes.
Contents
1. What should contractors plan before installing fiber cement siding?
2. Tools, safety gear, and materials that support a cleaner install
3. Wall preparation sets the life of the cladding
4. Core siding installation steps for fiber cement
5. How does fiber cement compare with other home siding options?
6. Common mistakes that lead to callbacks
7. When should a project use professional installation services?
8. Post-install fiber cement maintenance protects the investment
1. What should contractors plan before installing fiber cement siding?
Before the first board is lifted, contractors should plan the wall assembly, safety controls, cutting workflow, fastening method, clearances, local code requirements, and manufacturer specifications. Fiber cement siding installation is not simply a carpentry task; it is a moisture-management system that must perform together with the sheathing, weather barrier, flashing, trim, ventilation gaps, and paint or factory finish.
Start by confirming the product type. Fiber cement board siding installation may involve lap boards, panels, shingles, trim boards, or battens, and each format carries its own layout rules.
Fiber cement board and batten siding installation, for example, demands careful layout so battens land consistently, panel joints stay supported, and vertical drainage paths remain clear. Contractors working internationally should also verify regional wind-load rules, fire-rating expectations, seismic requirements, and local standards for rainscreens or ventilated façades.
Before quoting, review site access, staging, waste disposal, removal of the old siding, substrate repairs, and finish requirements. These details shape the fiber cement siding installation cost as much as the material itself. A dense urban retrofit, a coastal home exposed to salt corrosion, and a high-altitude project facing freeze-thaw cycles will each call for different fasteners, flashing details, and labor planning.
2. Tools, safety gear, and materials that support a cleaner install
Because fiber cement contains silica, dust control must be treated as a core jobsite requirement rather than an afterthought. Choose cutting methods that limit airborne dust, and follow the safety regulations that apply in your country or region. At a minimum, crews should wear appropriate respiratory, eye, and hearing protection along with gloves, and should cut in controlled zones set away from other workers and building occupants.
A well-prepared crew typically needs:
· Fiber cement-rated shears, score-and-snap tools, or saws fitted with approved carbide or polycrystalline diamond blades
· Dust extraction or wet-cutting methods, where the manufacturer and local safety rules permit them
· Corrosion-resistant nails or screws rated for the cladding, substrate, and exposure zone
· Weather-resistant barrier, flashing tape, metal flashing, rainscreen components where specified, and a compatible sealant
· Levels, chalk lines, story poles, siding gauges, layout tools, and stud finders
· Primer or coating for field-cut edges, where the product instructions require it
· Lifting, storage, and handling equipment that prevents cracked boards and damaged corners
Material storage matters as much as installation. Keep boards flat, dry, well supported, and clear of the ground. Never install saturated siding, and avoid dragging panels across finished surfaces. These simple habits protect the finished appearance and reduce breakage before the work even begins.
3. Wall preparation sets the life of the cladding
Even the best siding material will fail when the wall behind it is uneven, wet, or poorly detailed. Strip out failed cladding, inspect the sheathing, and repair rot, delamination, loose framing, or damaged insulation before any new material goes up. Plywood, OSB, masonry-backed assemblies, and framed ventilated façades each require compatible fastening and moisture details.
Install the weather-resistant barrier to local code and manufacturer guidance, shingling each lap so water drains outward rather than into the wall. In wet, coastal, tropical, or cold climates, a rainscreen gap may be required or strongly recommended. Mark stud locations clearly, since fasteners must reach structure or approved sheathing at the correct penetration depth.
Check the walls for flatness before siding begins. Fiber cement is rigid enough to make waves, humps, and bowed framing obvious once installed. Correct those irregularities early with framing repairs, furring, or approved shimming instead of forcing boards into place.
4. Core siding installation steps for fiber cement
The exact sequence varies with manufacturer, climate, and wall type, but most professional fiber cement siding installation follows a disciplined order.
1. Remove and inspect. Strip the old siding where needed, examine the wall, and correct any structural or moisture problems.
2. Install barriers and flashing. Apply the house wrap, membranes, flashing tape, head flashing, kick-out flashing, and sill details so water always has a controlled exit path.
3. Set trim and starter details. Install approved trim, starter strips, and layout lines, and hold the required clearances above roofs, paving, decks, soil, and horizontal flashing.
4. Cut with dust control. Work outdoors or at a controlled cutting station, support boards fully, use the correct blade or shear, and protect field-cut edges as specified.
5. Fasten correctly. Use approved corrosion-resistant fasteners, and avoid overdriving, underdriving, edge blowout, or fastening too close to corners.
6. Maintain laps and gaps. Keep overlaps, expansion gaps, and joint spacing consistent. Lap siding generally calls for a specified overlap, while panels and battens need planned joint treatment.
7. Finish joints and penetrations. Flash every penetration, seal the joints that require sealant, and leave the drainage points that the system needs unsealed.
8. Inspect before painting or handover. Confirm clearances, alignment, fasteners, flashing, and sealant, and replace damaged boards before final coating or sign-off.
For many lap siding products, blind nailing is preferred because it conceals fasteners and helps the wall shed water, although face nailing may be required in high-wind zones or specific assemblies. Always follow the product documentation rather than falling back on habits learned from vinyl, timber, or metal siding.
5. How does fiber cement compare with other home siding options?
Fiber cement siding is prized for balancing durability, fire resistance, pest resistance, dimensional stability, and design flexibility better than many common home siding options. Next to vinyl, it is heavier, more labor-intensive, and less forgiving to cut, yet when installed well it delivers a more substantial appearance and stronger impact resistance.
For contractors, the comparison is about more than the board itself. Vinyl can be faster for some crews and cheaper in upfront labor, while fiber cement demands more planning, specialized tools, and careful moisture detailing. Timber offers natural warmth but usually needs more frequent coating and pest protection. Metal performs well in modern or commercial settings, but its detailing requirements and thermal movement are quite different.
The practical takeaway: recommend fiber cement when the client values longevity, curb appeal, fire-conscious design, and a stable exterior finish, and when the budget supports professional installation. If a client is choosing purely on the lowest initial price, explain the labor, maintenance, and warranty implications up front.
6. Common mistakes that lead to callbacks
Most fiber cement failures are preventable. Contractors should build quality control into the daily routine rather than waiting for the final inspection.
Watch for these problems:
· Cutting without adequate dust control or worker protection
· Installing over wet, rotten, uneven, or otherwise unprepared substrates
· Missing kick-out flashing where roofs meet walls
· Fasteners set too close to edges or driven in too deep
· Boards brought tight against trim, flashing, masonry, paving, or rooflines without the required clearance
· Unprimed or unsealed field cuts where the specification requires protection
· Sealing joints that should drain, or leaving open joints that should be sealed
· Mixing incompatible sealants, coatings, metals, or fasteners
· Overlooking local wind, fire, flood, termite, or seismic requirements
A short inspection at the end of each elevation can save hours later. Confirm that courses are level, joints are staggered or aligned as designed, penetrations are flashed, fasteners are correct, and damaged edges are repaired before the scaffolding comes down.
7. When should a project use professional installation services?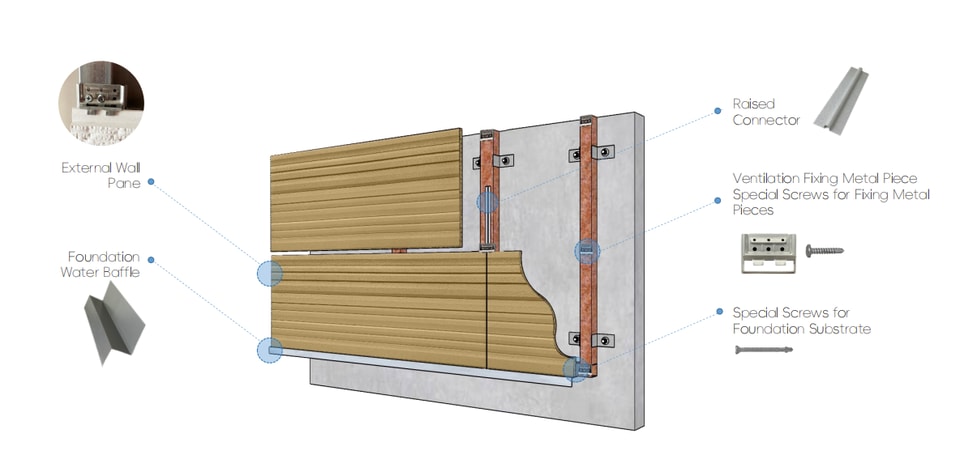
Professional fiber cement siding installation services are the safer choice whenever a project involves multiple stories, complex flashing, occupied buildings, strict warranty requirements, high-wind zones, fire-rated assemblies, or large-format panels. Skilled DIYers can handle fiber cement on small, simple elevations, provided they have the right tools and dust controls, the discipline to hold a layout, and confidence working around openings and penetrations.
Searches such as “fiber cement siding installation near me,” “fiber cement siding installation annapolis,” or “fiber cement siding installation denver” almost always come from owners looking for qualified local help.
Contractors win that trust by explaining their installation process, their code awareness, their safety practices, and how they handle moisture details.
The same principle holds for international projects: clients want a team that understands both the product and the local building environment.
8. Post-install fiber cement maintenance protects the investment
Fiber cement maintenance is relatively simple, but it should never be ignored. Advise clients to wash the siding periodically with gentle methods, keep vegetation trimmed back, maintain the gutters, and inspect sealant joints, paint, penetrations, and flashing transitions. In harsh sun, coastal air, heavy rainfall, or freeze-thaw climates, inspections may need to be more frequent.
Contractors should also document the installation as it proceeds. Provide product details, paint information, warranty paperwork, maintenance guidance, and photos of key flashing areas before they are covered up. Good documentation protects the client, supports future service work, and demonstrates professionalism.
9. Final takeaway
To install fiber cement well, treat it as a complete exterior system rather than a surface finish. Solid wall preparation, safe cutting, correct fastening, thoughtful flashing, and clear maintenance guidance are what turn a premium cladding product into a long-lasting façade. For contractors, a careful siding installation guide is more than a checklist; it is a way to deliver consistent quality across climates, codes, and client expectations.
Welcome to choose our Shengbaoqiang fiber cement boards.
Contact Us