
How to Install Fiber Cement Siding:Dry-Hung,Step by Step
How to Install Fiber Cement Siding: Dry-Hung, Step by Step
Fiber cement siding fails at the fixings, not in the panel. Get the cavity, the joints and the flashing in the right order and the board sits on the wall for twenty years. Get them wrong and you're back on the scaffold in eighteen months.
This is the dry-hung sequence we supply with our panels. No adhesive, no mortar bed, no wet trade on site.
The panel you're hanging
A 3,030 × 455 mm board, 16 mm thick. One panel covers 1.38 m² and weighs about 30 kg as shipped — plan for two people from the first lift.
| Property | Value |
|---|---|
| Size / coverage | 3,030 × 455 × 16 mm · 1.38 m² per panel |
| Weight | approx. 28 kg |
| Apparent density | 1.22 g/cm³ |
| Saturated bending strength | 8.6 MPa |
| Water absorption | 16.5 % |
| Moisture deformation | 0.05 % |
| Thermal conductivity | 0.25 W/(m·K) at 25 °C |
The core is cement, fiber, silica fume and mica, formed under high temperature and pressure and cured twice before cutting. What you see is a four-layer coating: penetrating primer, decorative topcoat, matte protective layer. You're hanging a finished facade, not prepping one.
Every panel in the crate is the same 455 mm. That matters more than the 1,500,000 m² annual capacity behind it, because a module that drifts halfway up an elevation is a rebuild.
The system, and why the cavity matters
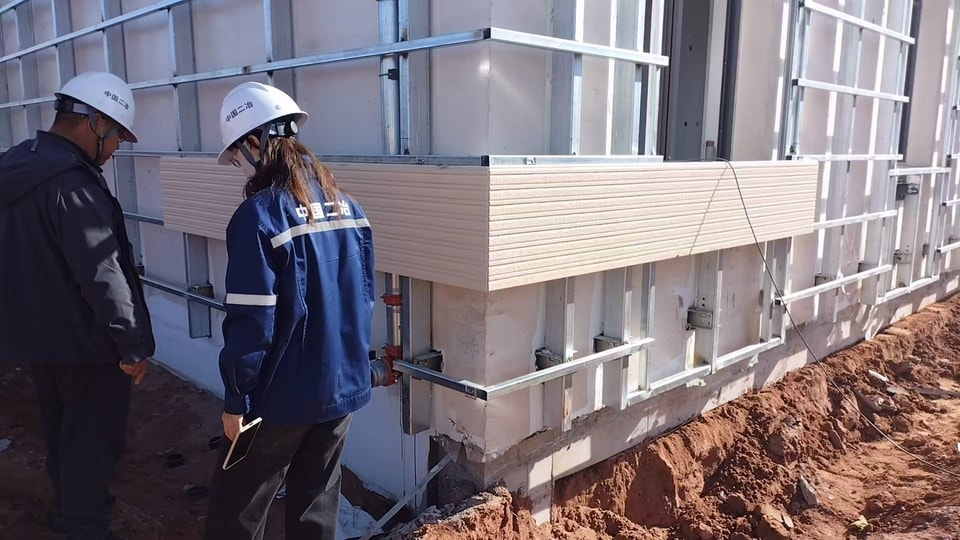
Dry-hung means the panel rides on metal connectors fixed to a rail, with an open cavity behind it.
| Component | Job |
|---|---|
| Raised connector | Hooks the panel to the rail; concealed, nothing shows on the face |
| Ventilation fixing metal piece | Vertical rail, carries the connectors, sets cavity depth |
| Base water baffle | Sheds water out of the cavity, blocks wind-driven rain at the inlet |
| Breather membrane | Vapour out, bulk water off the sheathing |
The cavity runs the full height of the wall, open at the base and open at the head. Air enters low, warms, rises, leaves at the top carrying moisture with it. Block that path anywhere and you've built a condensation trap with a decorative face. Cavity depth and rail spacing come from the wind load on that elevation, not from habit.
Step 1 — Set out before you touch a panel
Check the substrate is plumb, dry and sound. A 3 m straight edge tells you more in ten minutes than a level does all morning. There's no thickness in a 16 mm panel to hide a deviation — whatever the frame does, the facade copies.
Brick or block gets a parge coat or packers before the rails go on. Concrete needs its moisture down to what the membrane can handle, and a reading taken on site beats an assumption made in the office.
Then set out on the 455 mm module, marking panel edges and openings together. Landing a reveal on a module joint is easy on paper and miserable on a wall.
Joints get an allowance, not a butt. At 0.05% moisture deformation a 3,030 mm panel moves about 1.5 mm. Small, but a tight butt has nowhere to go, so the movement shows up as a cracked bead or a lifted edge.
Step 2 — Membrane, base baffle and the air path
Run the breather membrane over the substrate, lapping in the direction that sheds water, and tape the laps. Lap it over the base baffle, not under — water runs downhill and it will find the wrong lap every time.
The baffle does two jobs: it throws water out of the cavity and stops wind-driven rain being pushed up into it. It also sets the lower inlet, so it sits below the first panel with the cavity open above.
Check the path before you close anything up. Look up the cavity from the base; if you can't see daylight at the head, air won't move either. Insulation goes behind the membrane, never into the cavity — the cavity is for air.
Where pipes, brackets or cables cross the membrane, seal the penetration before the panel goes on. A neat hole with a grommet outlasts a generous bead of sealant, and it's the one leak you can't see once the facade is closed.
Step 3 — Rails, connectors and the first panel
Fix the rails plumb. Spacing and fixing centres come off the project drawing and change with wind load, panel height and substrate; don't carry a number from the last job to this one.
Hang the first panel on the baffle, engage the raised connectors, check level before you drive anything home. That panel sets the line for everything above it, so this is the one time to be slow.
Drive until the connector seats. Over-driving crushes the board around the head and leaves a stress point that shows up later as a hairline crack; under-driving leaves it loose in wind. If a screw spins it's in the wrong place — move it, don't torque it harder.
Check plumb on the rail, then on the panel. A straight rail and a crooked panel usually means a connector that hasn't seated, not a rail that moved.
Step 4 — Run the field, then close the top
Work upward in courses, keeping the module and the joint allowance consistent. Check plumb every third or fourth panel, not at the end: 3 mm at the bottom is 30 mm at the head of a three-storey wall.
At openings, cut and dry-fit first. Flashing goes on before the panel does, not after.
Close the top with a head flashing that still lets air out. A sealed head turns a ventilated facade into a sealed box. This is the detail fitters rush and the one that decides whether the cavity works.
Handle panels flat on battens, never on edge or bare ground. Cut outdoors or with extraction running and an H-class respirator on — silica dust is the one real health risk in this trade. Support both sides of the cut, and seal cut edges with the matching coating. An untreated edge wicks water and is the first place a facade looks tired.
What fails six months later
None of these are product faults. All of them are sequence decisions.
| What you see | What caused it |
|---|---|
| Cracks at panel corners | Tight butt joints, no movement allowance |
| Damp at the base | Baffle missing, reversed or set too high |
| Mould in the cavity | Ventilation path blocked at head or base |
| Rust streaks below screws | Wrong screw type |
| Coating blistering | Cut edges and drilled holes left unsealed |
Walk the wall after the first rain, not the first month. Water leaves a trail within hours, and a stain you can still trace is a detail you can still fix.
Every line in that table costs a day of scaffold time to put right. Which is why the sequence matters more than the speed, and why the first panel is worth an hour on its own.
Request our installation drawing with your quotation — contact us and tell us the substrate, the elevation height and the wind or fire requirements your market applies.
Contact Us